Make sure you are logged into pepper.
(Then the scripts c2mod.py and runptsim.py will be called for you and you do not need your own local copies)Create your .mpd.conf file in your home directory
Create a file called .mpd.conf in your home directory:$ vim .mpd.conf
The file should contain the following text (choose anything for your <secretword>):
MPD_SECRETWORD=<secretword>
Change the file permissions of the file to read and write access only for the user:
$ chmod 600 .mpd.conf
Go through these examples
1. Add Example2. FIR Example
How to Write Your Own Parallel C Program
1. Create a local directory where you will work with your project$ mkdir myparallelprog
2. Navigate into that directory which you just created
$ cd myparallelprog
3. NOTE: You must be consistent in naming your files.
If you name your program myparallelprog.c, you must
also name your input data file myparallelprog_input.dat
and your xml file created with asapmap must be named myparallelprog.xml
4. Create a new file in your text editor (i.e. vim) and name it myparallelprog.c
5. Create a new file in your text editor and name it myparallelprog_input.dat.
(This will be your input data file. You may copy your input data into this file,
one value per line. This is the data that your primary input will receive when it
reads from its ibuf)
6. Begin writing your parallel C program in myparallelprog.c
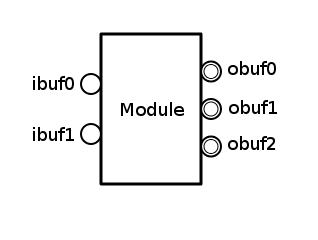
Each function you write will be converted into a module (block) by c2mod.py.
Each function must be written as follows:
begin functionname
// Declaration of variables (all integers)
// Input and output buffers must be declared here
// i.e
int ibuf0; // input buffer 0
int ibuf1; // input buffer 1
int obuf0; // output buffer 0
int obuf1; // output buffer 1
int obuf2; // output buffer 2
int var1 = 0; // example variable
int myvar = 5; // example variable
// For loop to continuously run
for(;;) {
// Code to run
}
end
7. Remove the following from your original C program:
-
a. Function Parameters
Your data is going to be passed in and out of buffers, so you cannot pass values
between your functions by reference.
b. Function Prototypes
c. Global Variables
Nothing in AsAP is 'global', therefore global variables have no analog.
Thus, all #define lines must be removed and those variables declared within the functions which use those values.
d. main Function
Your modules will not be 'called' individually, they will (by definition) be running concurrently.
e. File Pointers
You may be trying to load data from a file for your memory, but that is not allowed.
This is because runptsim.py does not recognize FILE * fp;
You will need to initialize your array manually when you declare it.
If your array is large, write a script to write your declaration and initialization
for you so that you can just copy and paste it into your .c program.
f. Block Commenting
The script c2mod.py will not interpret block comments (/* code */) properly.
Notice that numbering starts from 0 at the top and increases as you go down

9. Use printf() statements for debugging your .c code file
The MPI simulator allows printf() statements, which can be used for debugging.
These printf() statements will be executed when you run the following:
runptsim.py myparallelprog.c
10. Input and output buffers cannot be used on the same line
Incorrect:
obuf0 = ibuf0;
obuf1 = myarray[ibuf0];
Correct (use temporary variables to store inputs):
temp = ibuf0;
obuf0 = temp;
temp = ibuf0;
obuf1 = myarray[temp];
11. Inputs cannot be read into an array
First save inputs to a temporary variable.
Otherwise, your program may enter an infinite loop.
Incorrect:
for (i = 0; i<=7; i++) {
myarray[i] = ibuf0;
}
Correct:
for (i = 0; i<=7; i++) {
temp = ibuf0;
myarray[i] = temp;
}
12. Do not perform any math when indexing an array
Use a temporary variable to store the index
Incorrect:
obuf0 = lookuptable[12*value1 + i];
Correct:
index = 12*value1 + i;
obuf0 = lookuptable[index];
13. When running runptsim.py the following error may occur:
Fatal error in MPI_Recv: Other MPI error, error stack:
MPI_Recv(186)......................: MPI_Recv(buf=0xbfd36e9c, count=1, MPI_INT, src=28, tag=0, MPI_COMM_WORLD, status=0xbfd36ea0) failed
MPIDI_CH3I_Progress(412)...........:
MPID_nem_handle_pkt(587)...........:
MPIDI_CH3_PktHandler_EagerSend(606): Failed to allocate memory for an unexpected message. 261895 unexpected messages queued.
The error can occur even after running runptsim.py several times.
This is NOT an error with your code.
This an MPICH2 related error caused by too many messages being
stored in the internal buffer and eventually the buffer runs out of memory.
For more information, refer to: Argonne MPICH2 Wiki.
If all else fails, insert printf() statements in your code and redirect output to a file.